In my last blog, The Best Position to Relieve Back Pain, you discovered that many instances of back pain are due to misalignments in the pelvis and spine. However, as the blog notes, you can correct these imbalances with the static back and constructive rest positions. In order to remind yourself of this issue, check the blog for descriptions and pictures of both. Once the body is returned to neutral alignment, the next step is to strengthen this improved position. This blog introduces Egoscue Method© exercises you can do after achieving a balanced posture. Although you do not need to do all of the exercises listed, I encourage you to complete at least one. If you do this, it will help to solidify your alignment and extend your pain-free hours.
 Static Wall
- First, lie on your back with your legs up the wall. You want to have your butt as close as possible, preferably touching the wall in this position. However, if you feel your butt is rising up, move back until you feel relaxed and supported by the ground.
- Now, pull your toes back toward your head, flexing at your ankles. While doing this, imagine you are standing on the ceiling and want to have your feet as flat as possible. Although it is common to have some rotation in the feet, particularly with your pinky toe higher, as you can see in the picture, you should strive to pull your pinky and big toes back evenly.
- Next, flex your upper thighs—your quads—by pushing your knees toward the wall. Keep your back relaxed and firmly in contact with the ground as you do this.
- Meanwhile, relax your upper back, neck and shoulders with your arms out to your sides, palms up.
- At this point, lengthen your neck and tuck your chin slightly so that the back of your head has more contact with the ground.
- Work up to holding this position—with your lower body tensed and upper body relaxed—for four minutes.
 Sitting Floor
This next position flips the Static Wall exercise to work against gravity. Many of the same instructions apply.
- First, sit with your back to the wall. Your butt should be touching the wall. If it doesn’t, just get it as close as possible to the wall without straining.
- Here, notice that your lower back should arch away from the wall, while your shoulder blades contact the wall.
- Throughout this exercise, keep your neck and head in a neutral position. Depending on your posture, your head may or may not touch the wall. Either is fine. However, be sure that your chin is parallel to the floor.
- Next, pull your toes back toward your head, flexing at your ankles.
- Then, flex your upper thighs—your quads—by pushing your knees toward the ground.
- Now, place your hands in your lap, palms up.
- At this point, pinch your shoulder blades down and together. You should feel the muscles between your scapula and spine engage. If you feel tension in your upper shoulders or neck, focus on only moving your shoulder blades down to start. In other words, do what words best for you.
- Work up to holding this position—with your lower and upper body tensed—for three minutes.
 Airbench
- First, sit against the wall with your upper legs at or near parallel to the floor and feet hip-width apart, facing straight ahead.
- Now, push your heels into the floor, while maintaining contact with your toes. Notice that I have shoes on to prevent slipping.
- Next, rotate your pelvis under (tuck your tail) to flatten your back against the wall.
- At this point, pull your shoulders back flat into the wall only if you can do so while keeping your lower back flat. Commonly, the lower back will move away from the wall when the upper back is flattened. Your priority is a flat lower back.
- Work up to holding the position for two minutes.
 Counter Stretch
- First, place your hands on a desk, counter, back of a chair, etc, so that you have a nearly straight line from your hands to your butt. You can also use a higher surface, which reduces the intensity of the stretch.
- Next, walk your feet back so that you are in an upside down “L” position with your body. Your ankles should be directly under your hips, and your weight should be evenly distributed through both feet.
- Now, lengthen your back muscles and spine by pushing your butt back, away from your hands.
- Then, tighten your thighs and roll your pelvis forward to place an arch in your lower back. If you already have a well-defined arch in your lower back, you can skip this step.
- Finally, allow your upper body to drop toward the floor with your head in a neutral position between your arms. Let your shoulder blades slide down and together.
- Hold for 1-3 minutes.
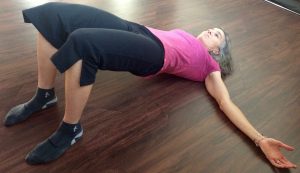
 Bridge
- First, lie on the ground with your knees bent at 90 degrees and your upper body relaxed, arms out to your sides between forty-five and ninety degrees with your palms up.
- While you are here, maintain sensory awareness of your heels and big toes without pushing into the ground for proper alignment of the feet, knees and hips. There is a tendency for the feet to roll out, which is why you need to keep the big toes down. This is best felt without shoes.
- Now, inhale. Then, as you exhale, flatten your back by gently tipping your pelvis up toward your head. Push your knees forward slightly to engage your deep transverse abdominis muscle. Meanwhile, avoid over-contracting your rectus abdominis (“six-pack muscle”). Keep this muscle relaxed. Maintain this position throughout the exercise.
- Next, pull back into your heels to engage your hamstrings, and lift your hips off the ground by using your glutes. This will cause you to feel your hamstrings and glutes working. Without allowing your lower back to overly arch, keep the activation in your abdominals to ensure that you maintain good alignment through your torso.
- While you hold this position for a minute, breathe in through your nose and out through your mouth.
- Repeat one or two more times.
If you have any questions on these exercises or want to talk about how posture therapy could help your back pain, please contact me for a FREE CONSULTATION.


