How aligned is your posture?
When striving for improved wellness in any area of life, it is always a good idea to have a baseline. For example: before starting a medication for high blood pressure, you measure your current readings. When beginning a healthy nutrition plan (diet), weight is recorded so that losses can be tracked. For posture, the standing assessment is the baseline tool of measurement.
Standing Posture Assessment
This assessment can be done in front of a mirror, although taking posture photos is preferred. When looking at a mirror, the only view you can clearly see is the front view. To see your side, you have to move your head, which can change your position. Additionally, you cannot assess your back view when using a mirror. A further drawback of using the mirror is that you are not able to do side-by-side comparisons of your left/right and front/back positions.
Tips for Taking Posture Photos:
- Take four photos: front, back and both (right/left) side views.
- Stand barefoot with minimal clothing.
- Men: shorts
- Women: shorts and sports bra or tight-fitting tank top
- Stand on hard, even floor.
- Have a simple, non-distracting background.
- Pull up long hair.
- Position your camera at waist level.
- If taking your own pictures, consider using your smartphone camera, which may have a longer timer setting that laptop programs such as Photo Booth.
- Take close-up photos, just fitting your whole body in the frame of your camera.
- No posing—you want to capture your natural, relaxed posture, not what you think you should look like. Posing gives false data. You want to know how your body arranges itself under the force of gravity.
Analyze Your Posture
In Chapter 7 of my book, Winning The Injury Game, I provide several questions to answer regarding your standing posture assessment. Below are a few to consider:
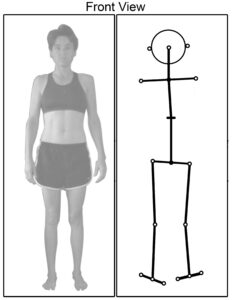
Front/Back View
- Do both feet face straight ahead?
- Do your knees line up with your ankles? Or are they inside your ankles, coming close together (knock kneed), or are they outside your ankles, moving away from each other (bow legged)?
- What part of your hand is facing forward—the back of the hand, the thumb, or somewhere in between? (Note: This is assessing rounding in your shoulders. The ideal position is with the thumb forward.)
Side View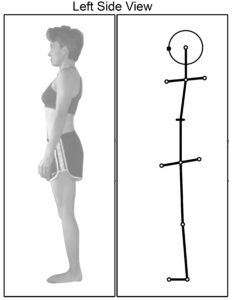
- Are your ankles, knees and hips aligned? (Hint: Observe if your legs go straight down to the floor from your hips or if your lower legs go backward and hyperextend. If your heels come off the floor when you sit on the floor with your legs stretched out in front of you, thighs tightened, your lower leg is hyperextended.)
- Are your shoulders and hips positioned directly atop each other?
- Is your head positioned forward, in front of your shoulders? (Hint: If you can’t tell, stand with your back to the wall. Your heels, butt and upper back should touch the wall. Heels may be slightly away from the wall, depending on your structure. Move your feet away from the wall slightly if you feel like you are going to fall forward. Notice if your head also touches the wall naturally, without forcing a contraction in the upper body. If it does, your head and shoulders are aligned. If you have to raise your chin and tilt your head back to get your head on the wall, your head is forward.)
Take a few minutes to determine your posture baseline today!